With home-based learning in full swing and holidays around the corner, you’ll definitely want to know how to keep your child from bouncing off your walls!
Kids love “crafting” and helping in the kitchen — so instead of leaving them to their devices between online classes, channel their boundless energy into these fun-filled edible kids’ crafts! Some of these crafts can also help in the development of crucial motor skills, as well as reinforce any concepts taught in school.
Get started with just a few ingredients you may already have lying around in your pantry, fridge or freezer!

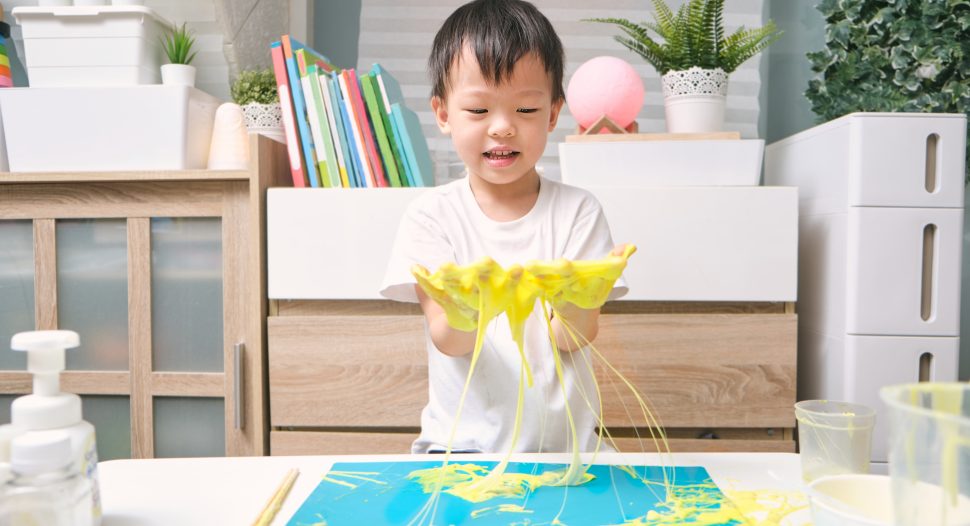
1. Gummy bear slime
For kids aged four years and above, this glue-free gummy bear slime recipe provides plenty of opportunities formessy and tactile sensory play to further develop their gross motor skills¹. While it’s taste-safe, we don’t recommend it as a snack after playtime. It’s only great if your kid tends to put everything in their mouth!
What you need:
- 1 cup gummy bears
- 2 tbsp cornstarch
- 1 tbsp icing sugar
- ½ tbsp oil (as needed)
What you need to do:
- Microwave the gummy bears on high heat for 30 seconds. Repeat until the gummy bear mixture is completely smooth.
- Combine cornstarch and icing sugar. Once the mixture has cooled down, mix it with half of the dry ingredients on a clean work surface.
- Knead the dry ingredients and use some oil to make the kneading process easier until it is no longer sticky. It has to become a nice gooey consistency!
Recipe adapted from Little Bins for Little Hands.
2. Grape sculptures
Grapes are the perfect fruit for this craft as not only are they healthy, but also stabilises the sculptures and helps them to stand on their own. You could also stimulate kids’ creative thinking by challenging them with a design problem. For example, can they build a square? Four squares stacked on top of each other? A car? A parking garage for the car?
This will encourage your child to go about deciding how many grapes and connectors they should use to solve it.
What you need:
- Handful of grapes (or other snacks of choice as connectors)
- Toothpicks
What you need to do: Simply place these two items in separate bowls on a table! Kids can help themselves to it as they experiment with building various two and three-dimensional shapes.
The best part? They can gobble up the grapes after, making this the perfect “brain food”!

3. Snack-worthy jewellery
All you need are ingredients that can string easily and stay strung! Getting the kids to create their own one-of-a-kind accessories can also help to sharpen their fine motor skills — getting all the delicious snacks on one string requires more hand-eye coordination and patience than you think.
What you need:
- Fine string (45-50 cm each, but you can shorten it if you’re creating other accessories like bracelets)
- 1 large sewing needle with an eye hole (to thread foods like grapes)
- Snacks of choice!
What you need to do: Separate the snacks of choice in separate bowls and let the kids get to it! Adult supervision may be required when a large sewing needle with an eye hole is needed to thread foods like grapes through a string.

4. Lego Rice Krispies
Got Rice Krispies in your pantry? Transform this well-loved cereal for satisfying the after-school munchies into these colourful and delicious Lego Rice Krispies! Any Lego lover will squeal at the sight of them and you’ll have stacks of fun making it together with the kids.
Prep time: 30 mins
Total time 30 mins
What you need:
- 5 cups Rice Krispies
- ¼ cup melted butter
- 4 cups marshmallows
- 1 large bag of M&M chocolate candies
Coloured icing
- 180 grams icing sugar
- 2 tbsp milk
- 3 tubes of food colouring (multiple colours: red, blue, green and yellow)*
*Available at your nearest FairPrice store

What you need to do:
- Pour the Rice Krispies into a large mixing bowl and set aside. Combine the melted butter and mini marshmallows, stirring until the mixture is completely smooth.
- Pour the mixture over Rice Krispies and stir until they are completely mixed together.
- Scoop the Rice Krispies into a lightly greased pan and press it down with a piece of wax or parchment paper until flattened. Pop it into the fridge for up to 15 mins to cool it down.
Coloured icing
- Combine the icing sugar with milk and mix well. It should be a thick liquid; add 1 more tablespoon of milk if needed to achieve the right consistency.
- Split the icing mixture between four small bowls — one for each colour.
- Add a few drops of food colouring to each icing bowl and mix. See how the colour looks compared to the colour of your M&Ms and add some more colouring if necessary.
- Cut the cooled down Rice Krispies into 18 rectangles. Spread the coloured icing on each rectangle and gently lay the coloured M&MS on top in parallel rows of 3 while it is still wet.
Note: Always place the M&M’s “m” side down so that it doesn’t show!
Recipe adapted from Mas & Pas.
Kids will have so much fun feeling, smelling and most importantly, tasting and learning with these edible crafts. We hope that you’ll have fun making it as much as they do!
***
References:
¹ Dziengel, A 2019, Don’t ban it! 5 reasons kids should play with slime, Babble Dabble Do, viewed 19 April 2021